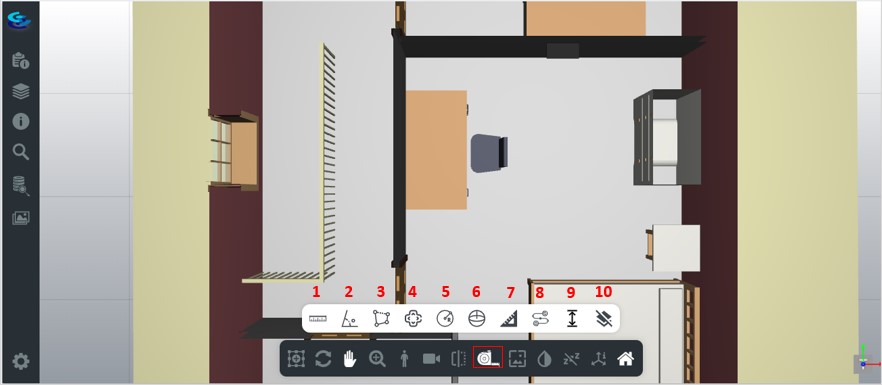
- The Fulcrum+ BIM Octagram viewer supports different types of measurements, including measuring the distance between two points, measuring the angle between two points, measuring the area, the distance from one point to multiple others, the turning radius, slope and path distance.
- To access these, click on the Measurement tool from the horizontal toolbar.
- Then select the measurement you wish to perform and place the points on the model.

1. To measure the distance between two points:
- Select the distance measurement from the measurement toolbar.
- Place your cursor on the first point from where the measurement should begin.
- To force a straight line, hold down the 'Alt' key while placing the second point where the measurement should end.
- The distance between the two points is computed and displayed.
- If you chose two points not on the same plane, you will also view the distance between the two points along the X, Y and Z axes.
2. To measure the angle between two points:
- Select the angle measurement from the measurement toolbar.
- This lets you measure the angle between any two lines on a model.
- You can place your cursor on the first point from where the first line of the measurement should be, and create the first line.
- Then place the cursor where the second line should be.
- The angle between the two lines is computed and displayed.
3. To measure the area:
- Select the area measurement from the measurement toolbar.
- This lets you measure the selected area on an element in the model.
- You can place your cursor on the first point from where you want to start the measurement, and continue placing points to capture the area. Once you are done, hit the 'Enter' key on the keyboard to stop the area measurement.
- The area between the selected points is computed and displayed.
4. To measure the distance from an origin point to multiple points:
- Select the distance origin measurement from the measurement toolbar.
- This lets you measure the distance from one origin point to multiple points on the model.
- You can place your cursor on the origin point from where you want to start the measurement, and continue placing points to capture the distance between the origin point and other points. Once you are done, hit the 'Enter' key on the keyboard to stop the origin measurement.
- The distance between the origin point and the other selected points is computed and displayed.
5. To measure the turning radius:
- Select the turning radius measurement from the measurement toolbar.
- You can enter the value of the turning radius, and the turning radius setback.
- When you place a point from where you want to measure the turning radius, a radius of the specified value gets created, along with a setback of the specified value.
- You can check that the turning radius meets the requirements and also check for any clashes with the help of the setback.
- You can move the turning radius with the help of the left and right arrow keys.
6.To measure the turning radius of a sphere:
- Select the turning radius sphere measurement from the measurement toolbar.
- Place and hold down your cursor on the first point from where the center of the sphere should be.
- Release the cursor when you have reached the desired radius length.
- Automatically a sphere with the set radius is generated and can be viewed along all x,y and z axis in 3D.
7. To measure the slope:
- Select the slope measurement from the measurement toolbar.
- This lets you measure the angle between any two planes on a model.
- You can place your cursor on the two points between which you want to measure the slope.
- The slope is computed and displayed.
8. To measure the path distance:
- Select the path distance from the measurement toolbar.
- This lets you measure the total distance covered from one origin point to multiple points on the model.
- Place a point from where you want to start measuring the distance.
- Keep adding points to this and once all the points have been added, press 'Enter' on your keypad.
- The total distance covered by the points is displayed.
9. To check for clearance:
- Select the clearance measurement from the measurement toolbar.
- Place a point on the model from where you want to start measuring the clearance.
- A straight line is drawn upwards in the X-axis of the model.
- The first element in the line of view detected will be highlighted in grayscale.
- If there are no clashing elements in the line of view of that point, there will be no change in the model.
10. Reset measurements:
- Use this option to reset all of the previous measurements. You can also delete your last created measurement with the help of the 'Delete' key.